Print File Preparation Guide
A quick reference for preparing your files for print. Follow these guidelines to ensure your prints
come out crisp, vibrant, and exactly as you envisioned.
Bleed & Cut Lines
Paper shifts up to ⅛" during cutting.
- Bleed: Stretch backgrounds to this edge.
- Cut/Trim Edge: Where the blade trims the sheet.
- Safe Zone: Keep critical content inside, ideally ⅛" from the cut line.
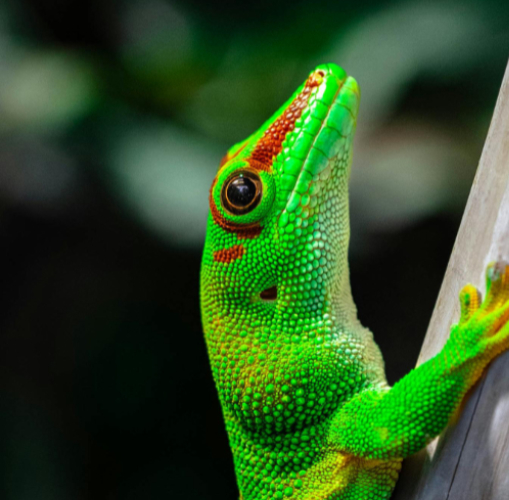
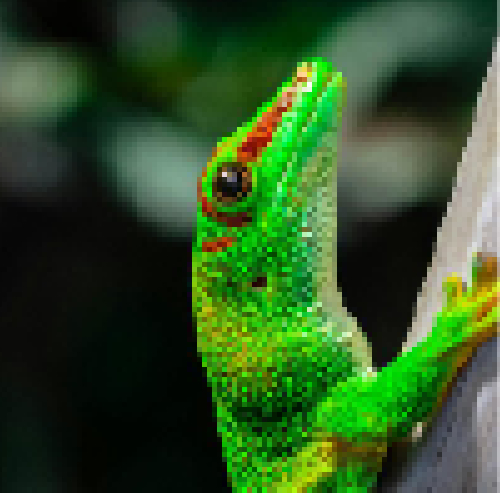
Image Quality (Resolution)
Commercial digital printing presses require crisp, dense data to achieve sharp results. While low-quality files might look perfect on your smartphone or monitor, physical ink behaves differently and will expose blurry artifacts.
- Vectors (PDF/AI) or high-resolution images (300 dpi): Produce a crisp, clear output, especially with text.
- Screenshots and many web images: Low-resolution DPI files print blurry or pixelated. Export as JPG/TIF/PNG at 300 dpi.
CMYK vs RGB
Screens use light (RGB) while presses use ink (CMYK). RGB can be used, but colors may shift when printed. If color is critical, request a printed proof sample.
- CMYK: Standard four-color physical press mix. Also used for our digital printer.
- RGB: Screen colors may shift when printed. Default for most digital files, incl. Canva free tier.
If possible, convert files to CMYK.
when printed
macOS files are not supported (.pages, .numbers, .key, .HEIC)
Many macOS and HEIC files from iOS are not supported.
Please use File → Export To → PDF inside your native Apple app, or convert at CloudConvert.com.
Ready to send your file(s)? Make sure you've checked everything!
Pre-Flight Checklist
- Background extends to bleed line (1/8" ideal).
- Text is inside safe zone.
- Output file is a PDF/AI/EPS or high-resolution raster image (JPG, TIF, PNG @ 300dpi).
Software Guides & FAQ
- Go to File → View settings → Check Bleed.
- Click Share → Download.
- Set to PDF Print and check Crop marks and bleed.
- Setup: Add 0.25 inches total to canvas width and height for bleed (e.g. 3.5"×2" card becomes 3.75"×2.25").
- DPI: Set resolution field to 300 Pixels/Inch.
- Color: Change dropdown from RGB Color to CMYK Color / 8-bit.
- Exporting: Go to File → Save a Copy…
- Format: Select "Photoshop PDF" from the drop-down menu.
- Preset: Choose "[Press Quality]" from the top menu, and click Save PDF.
Production begins only after your print-ready file and payment are confirmed.
No. Our prepress review checks exclusively for technical mechanical constraints (resolution density, bleed extensions, and file formats). We do not proofread text, catch spelling errors, or review design aesthetics. Please triple-check your copy completely before uploading your artwork!